Making and fitting fiberglass ferrules to bamboo fly rods
by Jim Morris

After the 2021 ‘Cressy Cane’ gathering in northern Tasmania I finally felt inspired (and confident enough) to write up what I’ve been experimenting with for the past two to three years – the substitution of fiberglass ferrules for traditional Nickel Silver (NZ) ones.
(Skip through the next few paragraphs if you are only interested in the ‘how to’ stuff and if that’s too long, you’ll probably work it out from the photos at the end!)
Advantages and disadvantages of fiberglass over NS and why not use graphite?
Fiberglass tubing is far lighter than NS, so you can dramatically reduce a fly rod’s swing weight while retaining the inherent ‘feel’ of bamboo. This may not be a huge advantage in two-piece designs, but for multi-piece designs (think 3 and even 4 piece ‘travel’ rods), eliminating some of the swing weight, especially towards the tip of a multi-piece rod, can potentially be a game changer. When I travelled to Scotland 6 years ago, I wanted to take a 4-piece, 8’6”, 5 or 6 weight bamboo rod with me to fish some of the lochs for trout, but reluctantly settled for ‘second best’ – a 4-piece fiberglass build I completed just before we left. Had I been building 4-piece bamboo rods with glass ferrules back then, I would have had no hesitation in taking an 8’6”, 5/6 weight of that design instead.
A fiberglass ferrule is also flexible compared to a rigid NS ferrule, so no matter how many ferrules you have in your bamboo design, it should feel more like a one-piece, compared to rods joined with metal which have flat spots even if the taper allows for extra flex of the bamboo on one or both sides of the ferrule to compensate.
A couple more advantages are the fact that glass joints tend not to stick when you disassemble your rod at the end of the day (no doubt everyone has experienced their NS ferrules sticking after a hot afternoon in the Sun). If you have access to a big pile of discarded glass rods, making these ferrules is far cheaper (and at the moment with freight delays in the US, far quicker); and finally, the use of my suggested design enables you to slightly lengthen your rod (if desired) even after you have cut the blank pieces to length to install standard NS ferrules. Having this last-minute choice will not always be a desirable thing of course. For example, I used the ferrule design to lengthen a Garrison 212e by 3 inches and it was a great success. On a later occasion I did the same thing to a PHY Para 15 and didn’t like the result as much, but I’m slowly getting used to it.
Obviously, there are some pretty strong arguments for sticking with NS too. 100 plus years of tradition is an obvious one and that also goes for aesthetics. Some makers and buyers simply couldn’t accept a rod built this way on either or both counts and that’s fine. Personally, I’m pretty pleased with how these glass ferrules look and when it comes to tradition, I think a bit of innovation helps rather than hinders the future of the craft as it always has done. If bamboo fly rod makers had ignored advances in technology in the past, we would still be using hide glues, brass ferrules etc.
Another argument is that many rod designs actually take advantage of the extra ‘swing weight’ imparted by using NS ferrules and this is particularly evident in some of the classic 3-piece designs that are still so popular. However, you can also easily compensate for the loss of ferrule weight by using a design program such as Hexrod. Interestingly I’ve also fitted glass ferrules to completed blanks specifically designed for NS ferrules and they worked really well without any apparent need to tweak the taper. One such blank was for a three-piece, 8’6”, 6 weight Leonard 51 made by Chapman. Everyone who has cast the completed rod has remarked how much it feels like a one-piece. As I frequently say to David H, bamboo is such a great material for making fly rods that you have to work pretty hard to stuff up your tapers!
“Won’t a glass ferrule wear out?” is another potential concern for this design. Well, all I can say is this type of glass spigot joint has been used successfully in fiberglass rod designs since the 1960’s by many famous rod and blank manufacturers such as Fisher, Winston, Scott and Scientific Anglers in the US, plus Hardy and Spectre in the UK. The main thing to design into a spigot joint to cope with extended use and consequent wear, is a ‘wear gap’ and I explain how to easily do that below. From my personal experience of fiberglass spigoted rods in the 1970’s and 1980’s, I’ve found that the wear gap only closes up after many years of hard use. My first ‘good fly rod’ was a two- piece, 9 foot, 7 weight Hardy JET bought in 1971 as a 14 year old and I used that one rod for all my fly fishing until I was well into my twenties – by then the ‘wear gap’ had finally closed; and yes, you can coat a glass spigot with very thin epoxy if necessary and carefully rub back with 0000 steel wool to restore it.
Finally, I believe that a fiberglass spigot ferrule will outperform a similar graphite spigot ferrule for two important reasons. Firstly, the flex of bamboo appears closer to fiberglass than to graphite, so the flex of any glass joint you use will more closely match that of the bamboo shaft on either side. That said, I think it is also important to choose glass tubing from rod stock similar in line weight to the bamboo blank you are ferruling. Secondly, my experience with fiberglass Hardy JET rods in the 70’s and 80’s was later repeated when I built a number of graphite Winston and Diamondback rods in the 90’s and 00’s. All of the above rods used spigot ferrules, but the fit of the glass ones lasted longer than their graphite counterparts.
How to?
1. Spigot Ferrules – the concept.
The design of a spigot ferrule is ingeniously simple and effective. The original concept in fiberglass fly rods is credited to Jon Tarantino from the US, who was a World Champion fly rod caster. Jon collaborated initially with Fisher in the US and later with Hardy to perfect his ferrule design.
So, imagine a hollow glass fly rod blank rolled on a single, tapered, round steel mandrel, to form a one-piece blank. Once that blank is removed from its steel core, it can then be cut into near equal length sections to create the genesis of a two, three, four, or more-piece rod. Each adjacent tapering section is joined by a tapering a fiberglass spigot of a certain length that exactly matches the internal diameters of those adjacent pieces. The spigot is only glued inside the butt side of each joint and projects inside the tip side of the next section to create a tight friction fit, but the blank is cut in such a way that when the sections are joined the outer tubes don’t quite meet; instead there is a small but significant ‘gap’. This gap is called the ‘wear gap.’ It will usually be around1/3’ to ½” with a new rod and will gradually close over the lifetime of the rod as the spigot and the female side of the ferrule wear.
2. A glass spigot ferrule that replaces a NS ferrule.
When a bamboo rod maker/builder fits a NS ferrule to a bamboo blank, they choose a ferrule size that closely matches the ‘flat to flat’ measurements (averaged) of the blank on the adjacent sides of the ferrule. The apexes of the bamboo are then sanded down carefully to fit closely inside each half of the ferrule before being glued in place. The same basic principles can be followed to create a perfectly fitting spigot ferrule made out of two pieces of tapered, hollow fiberglass rod tubing with different diameters, but the same slope, or taper. My advice is to choose tubing with a fairly shallow taper as opposed to a steep taper (easier to achieve a good friction fit and less likely to bind is my experience), so if you are using sections from unused, or broken glass blanks, 2 and 3 piece longer blanks (7’6” and up) are preferable to 4 and 5 piece short blanks. Personally I prefer to use spigoted glass blanks as opposed to tip over butt designs because of the latter’s use of a flair in the taper at the base of each section.
The easiest way to do this is to find two identical tapered sections of a glass rod/blank made from E or S Glass (although you can mix and match types of glass and colours providing both pieces have a similar shallow taper and one piece fits some distance inside the other). One of those identical sections will create the inner spigot of your ferrule and the other section will create what I refer to as the male and female outer ‘shoulders’ of the ferrule. The outer ‘shoulders’ end up covering both ends of the spigot and are glued directly over the prepped bamboo on both sides of the joint.
My starting point was to buy a few inexpensive, but reasonable quality 3-piece fly blanks in the sorts of line weights that corresponded to the bamboo rods I anticipated building (4 to 6 weight). I bought the blanks in pairs and soon discovered that I was only using the tip and mid sections of those blanks because the butt sections of most glass blanks are just too big to be of any use either as spigots, or ‘shoulders’! Clear or translucent blanks with a smooth, hard outer gloss coat are perfect, but if you are not too fussy about the colour of the spigot you end up with, then solid colours are fine. The shoulders of your completed ferrules including the ‘female’ should be wrapped in silk for reinforcement, then varnished, so you’ll only ever see the colour of your spigots.
The design of these ferrules follows the use of spigots in most well known fiberglass rods, that is the spigots emerge from the butt side of the joint and the ‘females’ that cover the spigots are always attached to the tip side of the joint. This has the additional advantage of you only having to build two females, rather than two spigots and male shoulders for two tipped rods.
At this stage you need to decide the final proportions of your completed ferrules. I suggest that all of your spigots should be the same length of 40 to 50mm (max), not including the part of the spigot covered by the outer ‘shoulder’ that transitions from bamboo to glass. The 40mm is based on the spigot lengths of a number of ‘name’ fiberglass rods from the 60’s and 70’s (Hardy, Fisher and Winston). The ‘shoulder’ lengths I’ve developed by trial and error and range from 50mm (ie 25mm covering the base of the spigot plus 25mm covering the bamboo that butts up to the base of the spigot) for a big butted 3-pce, down to 26mm (13+13) for the mid/tip of a light 4-pce. For the females, you’ll need to cover the full length of the exposed spigot (eg 40mm), plus half the length of the male ‘shoulder’ to just cover the bamboo (in the above examples +25mm for the mid female and +13mm for the tip female).
In a multi-piece rod, the male shoulders which overlap both the bamboo and the glass at the base of the spigot and the female shoulders which overlap the bamboo (but must also always cover the full length of the spigot), could be progressively reduced in length as you move up the rod to improve aesthetics. For example, with a long rod (8’6”, 6 weight, 3-pce), each overlap at the bottom ferrule could be between 20 to 25 mm and between 13 to 17mm at the top ferrule. So, a typical butt/mid ferrule on such a rod might measure 40mm for the male spigot, plus 20mm for the glass over glass part of the male shoulder, plus 20mm for the glass over bamboo part of the male shoulder (total length 80mm). The female side of the ferrule would need to cover the length of the spigot (40mm), plus 20mm for the glass over bamboo shoulder (total length 60mm). I have tested a number of ferrules down to those quoted lengths without failures, but cannot predict how short you might make your ferrule shoulders without them breaking or letting go from the bamboo.
3. Measuring and cutting both the spigot and its male ‘shoulder’.
- Use accurate calipers to average the flat to flat measurement on both sides of your prepared blank. If there is a difference (for example, with a step down design, the tip side may be several thousandths smaller than on the butt side), always choose the bigger of the two. Write down the measurement!
- Choose which of your two identical glass pieces will be used for the spigot and which will be used for the outer shoulders. I sometimes find one piece fits further inside its pair than the other piece, so the former will be the inner spigot and the latter will be used for the male and female outer shoulders. Use several wraps of ½” paper tape to reinforce the big end of the outer, ‘shoulder’ tube, so that it doesn’t split when inserting the ‘spigot’ tube.
- Using accurate calipers, locate the flat to flat measurement (above) on your spigot tube and mark the spot with a fine waterproof black pen. Don’t worry, the mark will come off with metho!. This is your most important measurement! I also write down the measurement beside the mark on the tube and allow the ink to dry. That mark is the point at which your spigot emerges from the male shoulder of the ferrule. Now, on the thinner side of your spigot tube, mark off the end of the spigot (eg 40mm) and carefully wrap paper tape, so that the outer edge is just beyond this second mark, keeping the tape square to the blank. I always use a symbol to indicate the side of the tape to make my cut to avoid mistakes. It is an arrow in all my photos.
- Cut off the end of this tube against the tape that marks the end of the spigot. Cutting alongside the tape keeps the cut square and makes it easier to smooth the cut sections on fine sandpaper afterwards. I prefer to use a ‘Junior’ hacksaw with a hardened steel metal cutting blade (32 teeth per inch) to avoid creating fiberglass dust as would happen using a grinder with a thin disc or dremel. I still wear a mask for safety (fiberglass dust is nasty stuff), even though the dust usually drops into a tray beyond a small wooden V block I use to slowly rotate the glass as it is cut. If you have a wooden roughing form, one end of that is perfect. I use light strokes to avoid tearing the glass and to keep the cut going at an even depth. Once you feel the glass begin to cut through right around its circumference, it will either fall apart, or use a very sharp, thin bladed knife to finish the cut. The whole process takes around 30 seconds for each cut once you’ve done a few. Finally, lightly sand the cut end of the spigot vertically on a sheet of fine sandpaper, unwrap the tape and very lightly bevel the small end of the spigot by turning it against the same paper.
- Just a quick explanation of the next step: the best way to get a perfect fit of your spigot inside both its male shoulders and within the female side of the joint, is to get the spigot to its final (short) length as soon as possible. Even cheapo glass blanks can have complex, changes in their tapers which can trade off the friction fit of your inner spigot tube inside your outer shoulder tube. So, you have a choice – 1. shorten up your spigot tube to its final length now, but then figure out a safe way to push it well inside the outer tube, mark off the flat to flat point on the outer and then reverse push the spigot back out; or 2. Leave the spigot tube long for now, so you can easily insert and remove it from the outer. I use both methods depending how far the spigot tube needs to be pushed inside the outer tube. Part of my aim here is to preserve as much of these valuable glass tubes for future ferrules, so I’m not going to sacrifice usable lengths of tubing unnecessarily.
- You can now insert the spigot tube inside the second tube and mark the outside of that tube where your first mark (flat to flat measurement) comes to. Be sure to press the inner tube in firmly, but not so firmly that you split either tube! With clear or translucent tubes, it is easy to see the mark on the inner tube through the outer, but if the tubes are a solid colour, just mark the point where the inner tube gets to at the lip of the outer tube and use that mark to measure off the distance to the flat to flat measurement. An even more accurate way of doing this (see 1. Above) is to first work out the final length of your spigot (ie 40mm + the length of spigot that will be covered by the male ‘shoulder’, say 20mm) and cut the thick end of the spigot tube to length. The problem with this method is that you’ll then need to insert the shorter tube into the outer tube with the help of a spare tip blank or similar. The upside is that it should insert further into the outer tube, so your mark on the outer tube will be more accurate! Remove the spigot carefully by inserting the tip piece in the opposite direction.
- Tape off the mark on your outer tube and then cut through the tube as above. This time, finish the end of the tube as you did for the end of the spigot, but do not bevel the edge. You want this tube square, so you can later bind it right up to the edge.
- Now that the narrow end of your male ‘shoulder’ is exposed (ie where the spigot emerges), tape it off as above and measure how long it needs to be to cover both the base of the spigot and the bamboo (eg 20mm to cover the spigot + 20mm to cover the bamboo). Mark, tape and cut the shoulder to length. Leave the tape in position at both ends for reinforcement and mark the big end as such. Insert the thin end of the spigot into the big end of the shoulder and carefully pull/it through to just expose your original flat to flat mark. If it is a firm fit, great (but don’t split the shoulder!) Most likely it will be a tiny bit loose, but that’s ok, it will glue up tight later.
4. Measuring the female, including its ‘shoulder’ and allowing for a wear gap.
The most important things to remember in preparing the female side of the ferrule, are: your very LAST cut should be at the thin end of the tube; and also, in allowing enough glass tubing for your female, the absolute minimum length of tubing you need to start with is the length of the spigot (say 40mm), plus the shoulder length to cover enough bamboo (say 20mm to match the other side of the ferrule), plus at least 20mm extra tube to allow for a slightly loose fit and a ‘wear gap’). In other words, make sure you have around 80mm or more of tubing available to create your females and more if you’ve chosen to use longer spigots!
Ok, so your spigot and male shoulder are done, but if you simply cut off a measured section of the remaining thin end of the outer piece of glass to make your female, that won’t work – the spigot may go in reasonably firmly, but without a ‘wear gap’ the overall fit will be loose in no time! Besides, it is easy to underestimate how far the spigot will go into the female once both sides of the ferrule are attached to bamboo glued and bound, so always play it safe. A big wear gap is fine; a too small wear gap is not!
My rule of thumb is to tape and cut 15mm off the big end of the tube that will form your female. With it still taped, carefully clean away any stray glass shards from the inside edge of the freshly cut tube with a short roll of very fine sandpaper and insert the spigot firmly but carefully. Note how much of a gap will be left between the edge of the female and your original ‘flat to flat’ mark on the spigot. Less than 15mm and I’d take off another 5mm as above and test again. Once you are happy that you will have a wear gap of at least 15mm and only then, measure off what you need for your female + shoulder, remembering that on this side, your shoulder only needs to cover the bamboo beyond the female. Now, tape and cut off the remaining thin end of the female tube. Your female is almost ready. Just make sure both ends are taped off for reinforcement and clearly marked. Remember that these are short pieces of glass tubing and it is too easy to accidentally reverse your taper. On my very first set I didn’t mark the female and ended up sanding too much off the bamboo when prepping before I realized I was fitting a reversed female and had to build up the bamboo again with Kevlar thread.
One final tip for making females if you have a two tipped blank. For your second tip you only need the female side of the ferrule and generally you’ll find a tube of the right diameter and length by reversing the roles of your original paired tubes. In other words, you can generally get your second female out of the bigger end of your original spigot tube. Insert your completed spigot to measure off the ‘flat to flat’ mark on the outer tube, but this time take your mark the additional 15mm you’ll need for a wear gap and do your cut there. If everything works and your wear gap is correct first time, then you only need one more cut at the thin end of the female to get it to exactly match the length of your first female. Done!
5 Gluing up the ferrule and remeasuring your blank sections before dressing the bamboo ends and attaching both sides of the ferrule.
Aside from cleaning the inside of the female(s) with a cotton bud dipped in metho, the only other prep needed for the female is to carefully bevel the outer edge of the thin end (a small bevel is enough and easily done by hand with 360 grit on a small block) to allow for your silk wraps to climb up from the bamboo onto the ferrule. However, I only do the bevel after dressing the bamboo to retain maximum strength during that process.
The spigot does however need to be carefully glued inside the male shoulder after cleaning the butt end of the spigot with fine steel wool with a little metho (just a few turns) and the inside of the male shoulder with a cotton bud as above. Be careful to leave your original flat to flat mark on the spigot, or if it wipes off, remeasure and mark it again! Don’t assume the butt of your spigot, or the inside of either the male shoulder, or female shoulder won’t need a thorough but gentle clean – some glass rod manufacturers use a ‘release agent’ on the outside of their metal mandrels and it may leave a thin waxy finish inside some blanks. Yes, I got caught out on one set of ferrules, which promptly pulled straight off the bamboo the first time I pulled them apart after test casting the rod!
Gluing the spigot inside its ‘shoulder’ tube is pretty straight forward. I use really thin laminating 2-part epoxy for this based on the woodworkers adage that the tighter the joint, the thinner the glue to use. I use Z-Poxy, PT-40 for most rod building jobs and it does an excellent job here as well. It is designed for laminating glass matt onto surfboards, so it is waterproof and gives you plenty of working time (at least 20 minutes). Thinly coat the inside of the ‘shoulder’ with glue using a tooth pick, insert the thin end of the spigot into the big end of the shoulder, push it through until it emerges on the other side and using a lint free cloth, or paper towel, carefully pull it through to your original ‘flat to flat’ mark on the spigot. Rotate the spigot a few times to evenly spread the glue inside the male shoulder and then very lightly clean the glue off the exposed spigot with your cloth. If the spigot pulls out a little, reposition and clean again and if you lose your flat to flat mark, don’t panic because you know how long that spigot is and your calipers are handy aren’t they? (Or use a bamboo satay stick, or similar with tour spigot length marked off.) After 15 minutes or so, I do a final wipe of the spigot with a cloth dipped in metho and meanwhile have removed any residual glue off the inside of the big end of the ‘shoulder’ with a clean cotton bud, but not metho in case it dilutes the glue. You’ll notice that the thin end of the spigot has picked up a little glue on its way through. You could choose to remove this completely with a tooth pick before it sets up, or leave a little to dry as a plug inside the end of the spigot. Up to you, but if you are using a clear spigot and yellowish epoxy like PT-40, my preference is to remove the epoxy and plug it later with clear stuff. The plug doesn’t have to be structural and it is probably better to put one in after gluing the spigot side to the blank anyway to avoid it lifting from air pressure while the glue dries. The plug is really there as a water dam and for aesthetics.
Finally, I dry the spigot inside its shoulder vertically overnight to ensure it stays straight. Make sure the glue has begun to set up first though!
6. Prepping your blank and gluing on the two sides of your spigot ferrule.
I’ve included a couple of pics of how I set up my blanks to fit these ferrules. Apologies to Nick T who provided us with the correct formulas for working out how much to trim blanks for conventional NS ferrules – when I see a formula, my brain turns to a panicked mush, so it is my failing! So, I always start with a blank cut into equal lengths (eg a 3-pce 8’6” will have section lengths of 34”) and then place all my ‘bits’ onto a table with the final lengths taped off, so I can then just shuffle around all the bits and pieces until they fit the ideal lengths of each section. You’ll notice from the relevant pics that I don’t include the spigots when deciding where to trim each section to length. You should feel free to defer and include the spigots in your final section lengths!
Dressing the ends of your blanks to fit these ferrules can be done exactly as you would for NS ferrules, but with three warnings:
- One, keep on that reinforcement tape and big end marking until it is no longer needed and it is especially useful for not accidentally reversing that short piece of glass that will become your ‘female’ (see above).
- Two, the fit you are aiming for is a light friction fit, not a tight, push on hard fit – the glass can pop a split quite easily if you force it. The glass tubing is really strong once glued and wrapped, but not at this point. I’ve split females a couple of times just at the point of getting the bamboo in far enough because I hurried. Ouch!
- Three, you are all used to the problem of the reverse taper of the tip fitting into a parallel tube with NS. The problem is more extreme with the female side of these ferrules because you have a reverse taper times two – not only is the bamboo getting thinner towards the tip, so is the tube you are fitting over it. Concentrate on the end third of your bamboo and work slowly because once you get it into the female shoulder that far, very little sanding is required to go all the way. You don’t want to have the female fitting sloppily because it may dry off centre.
7. Gluing on your ferrules.
With a slip fit and the right glue, this should be a cinch. Just remember to put a very small bevel on the bamboo edge of both your male and female sides of the ferrule before you glue it on, so that you can run your silk thread straight onto and over the glass for reinforcement. The alternative is to put a small bead of epoxy around the edge of where the glass meets the bamboo to form a ‘ramp’ for your threadwork once the initial glue has dried. I often do this with a bead of 5-minute epoxy and if you wait until the glue has almost set, rubbing it with a piece of cloth dipped in metho will get that ‘ramp’ perfect!
I also make sure I brush a little of my thin epoxy onto the ends of the bamboo while I’m getting ready, so that it has time to soak in and form a water barrier (for the female especially).
After gluing, I swab out the inside of the female with a couple of dry cotton buds immediately; and again after 15 minutes or so with a clean cotton bud lightly dipped in Metho. This is necessary so you don’t add a film to the inside of the female and end up with a huge ‘wear gap’! A little bit of glue pushed into the bottom of the spigots won’t cause any dramas, but if it fills them half full, you have used way too much to begin with. Dry your ferrules vertically with the females uppermost, so there is no glue creep into them and so everything dries straight.
I strongly recommend reinforcing both sides of the ferrule with thread and varnish once the glue has dried
If everything has gone to plan, your completed glass ferrules will fit so well that they pop every time!
Happy glass ferruling!
Jim
The following sequence of photos follows the entire process.
Apologies for the mix and match nature of the photos. I had trouble retrieving some of my photos from various locations and Mr Google didn’t help at all by taking over my word document in G drive and insisting on converting all my pics into something equivalent to pdfs.
Apologies for the mix and match nature of the photos. I had trouble retrieving some of my photos from various locations and Mr Google didn’t help at all by taking over my word document in G drive and insisting on converting all my pics into something equivalent to pdfs.
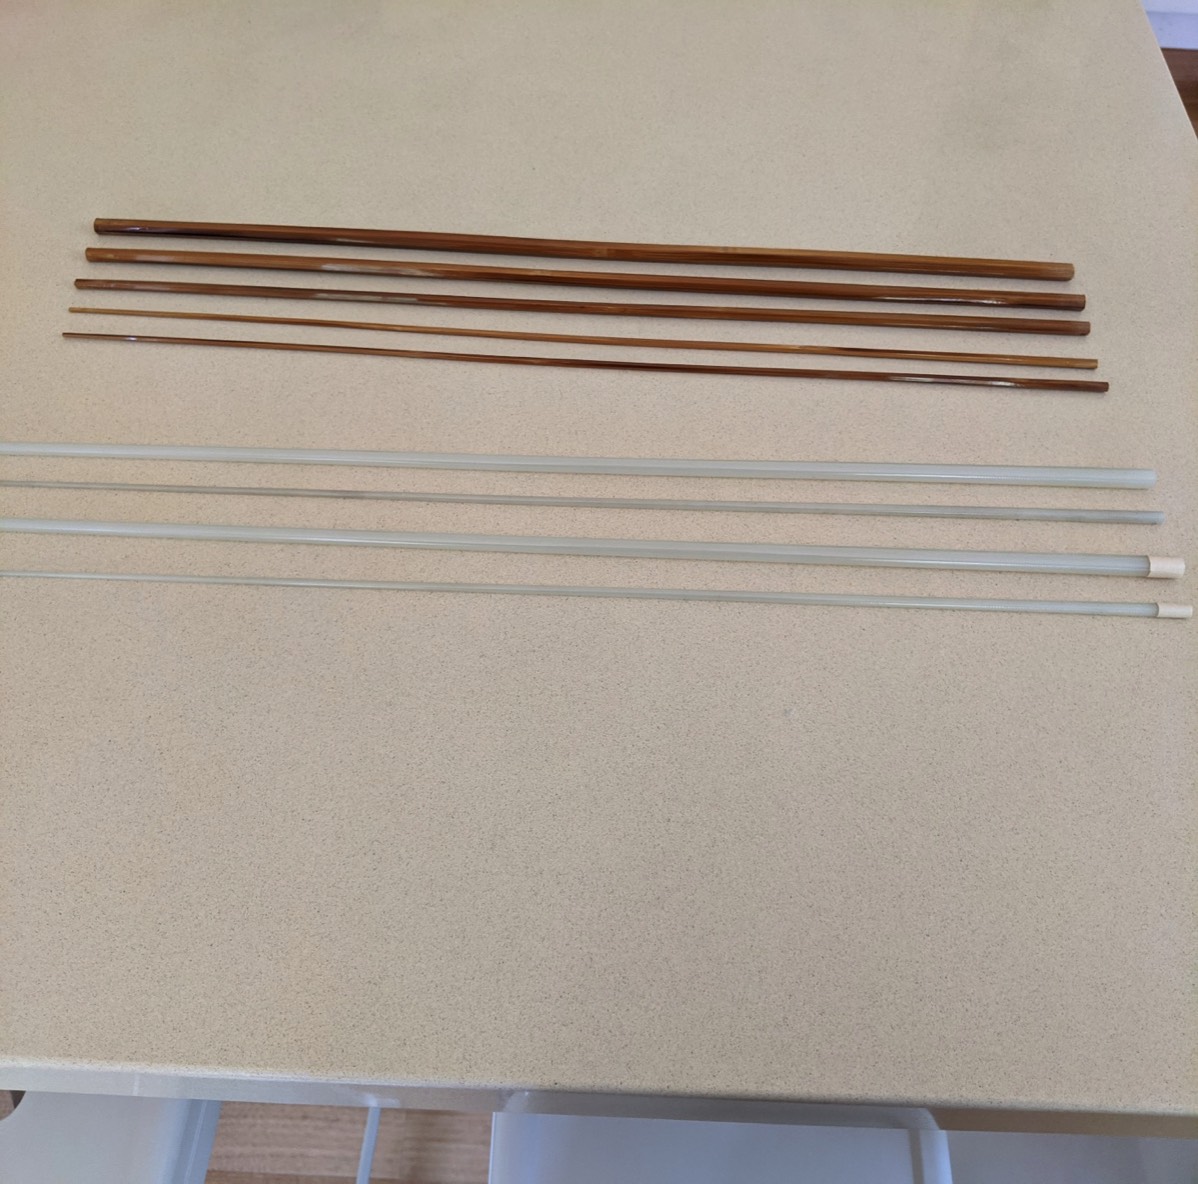
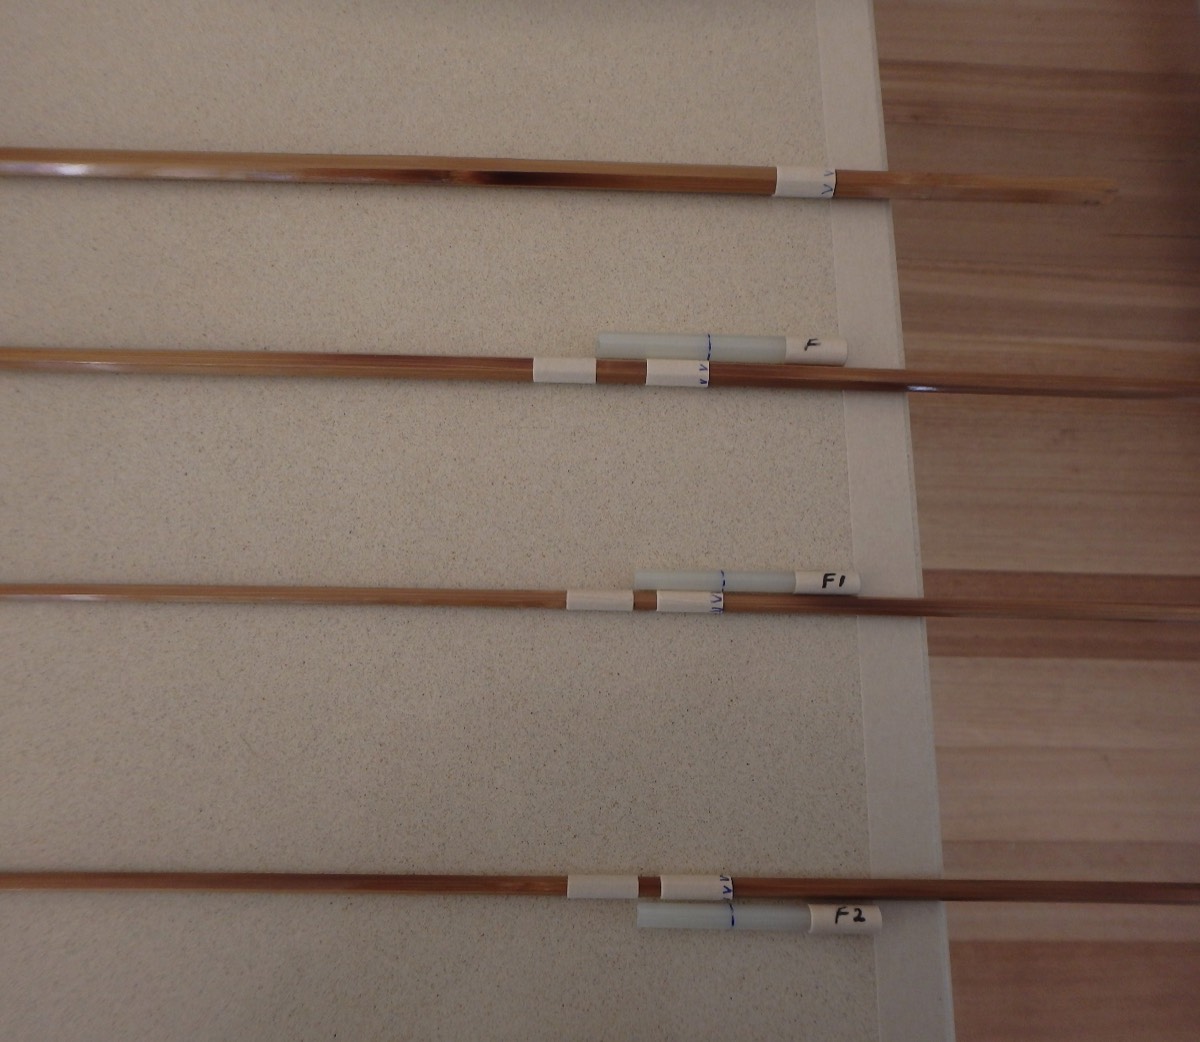
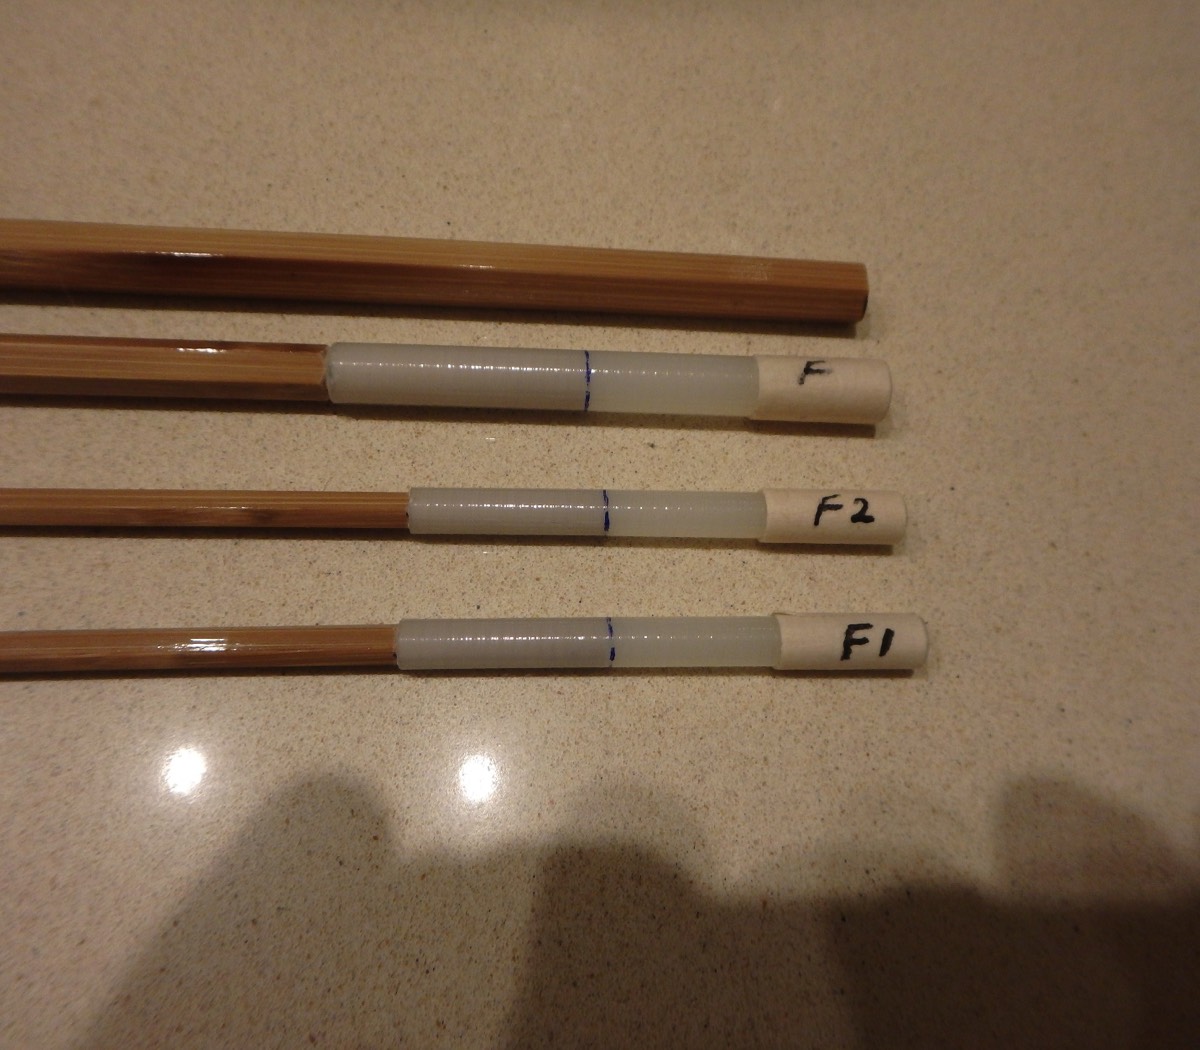
Bamboo blanks cut to length and two sets of paired glass tips and mids selected to cover the appropriate flat to flat measurements of the required ferrules. This was a 4-pce rod, so 3 sets of ferrules were needed. Taped blank ends indicate which tubes will be used for the outer ‘shoulders/females’
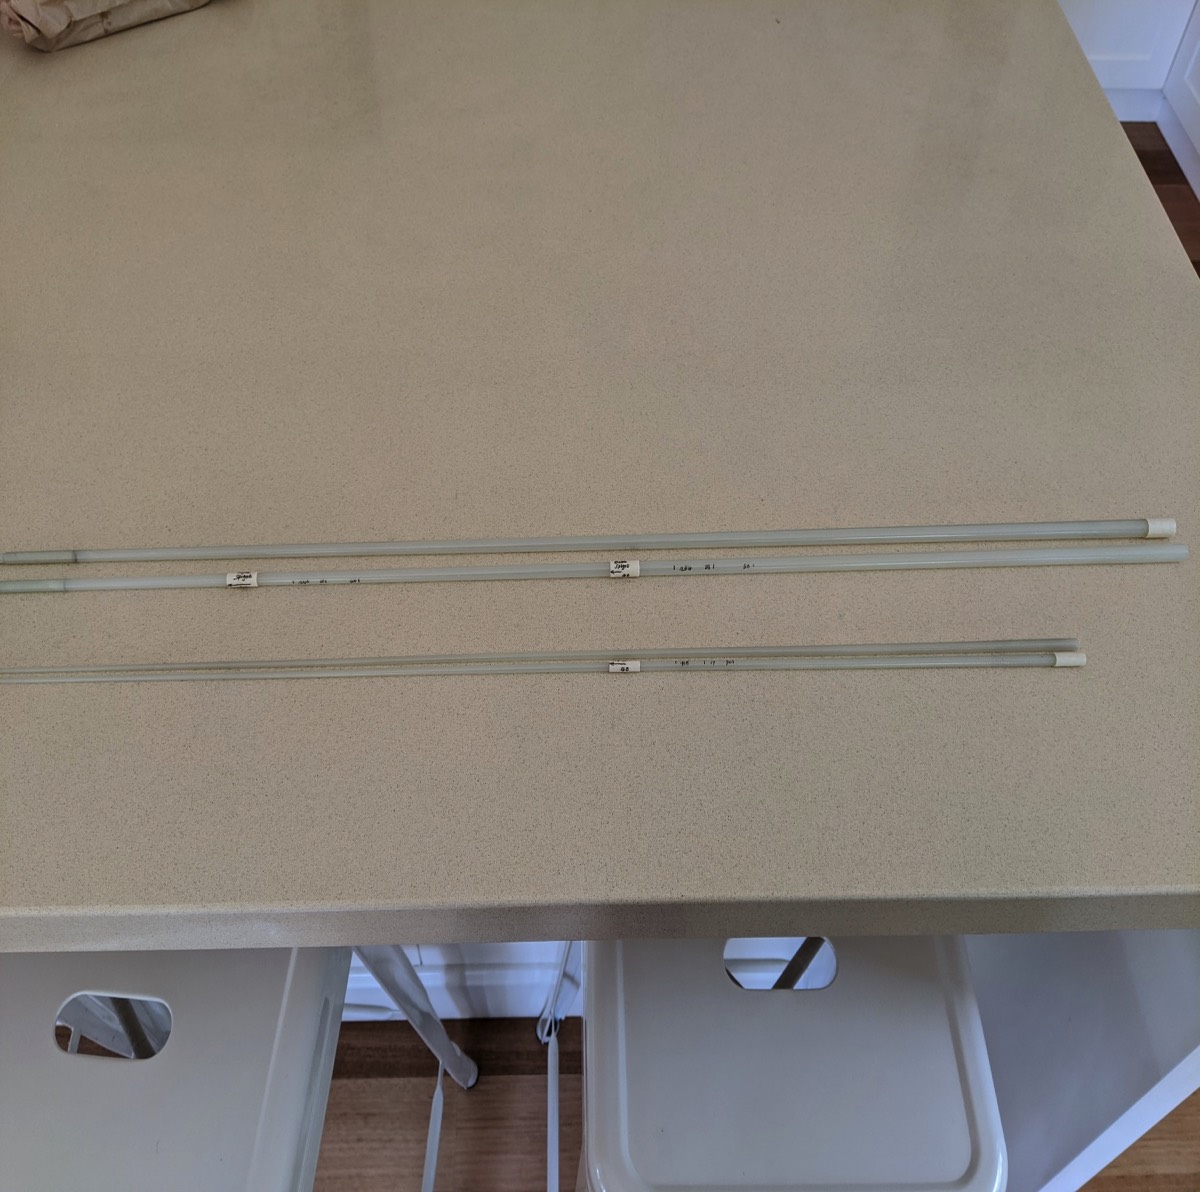
I’ve marked off the three ‘flat to flat’ measurements and taped off 40mm for each spigot. I’ve also marked off the male shoulder measurements for each of the three ferrules. The length of each shoulder reduces progressively from butt to tip to reduce the total length of each ferrule as would happen with NS ferrules.
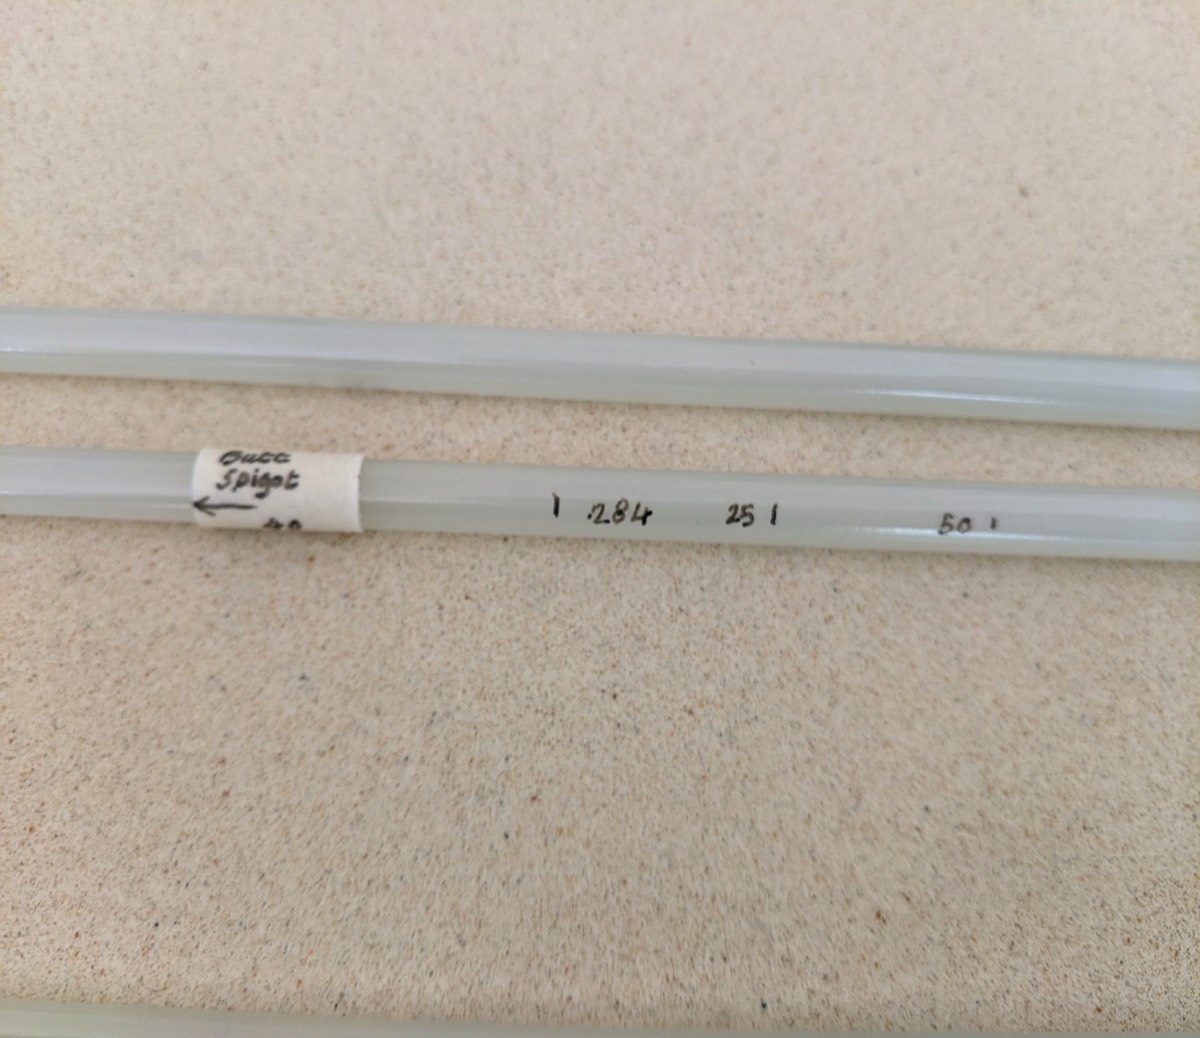
Close up of the initial markings of the butt spigot tube. I always use an arrow to indicate which side of the tape to cut. The first mark to the right of the tape is the ‘flat to flat’ measurement. The second mark is where the butt side of this spigot will eventually be cut off and the final 50mm mark is a reminder of how long the male ‘shoulder’ needs to be in total.
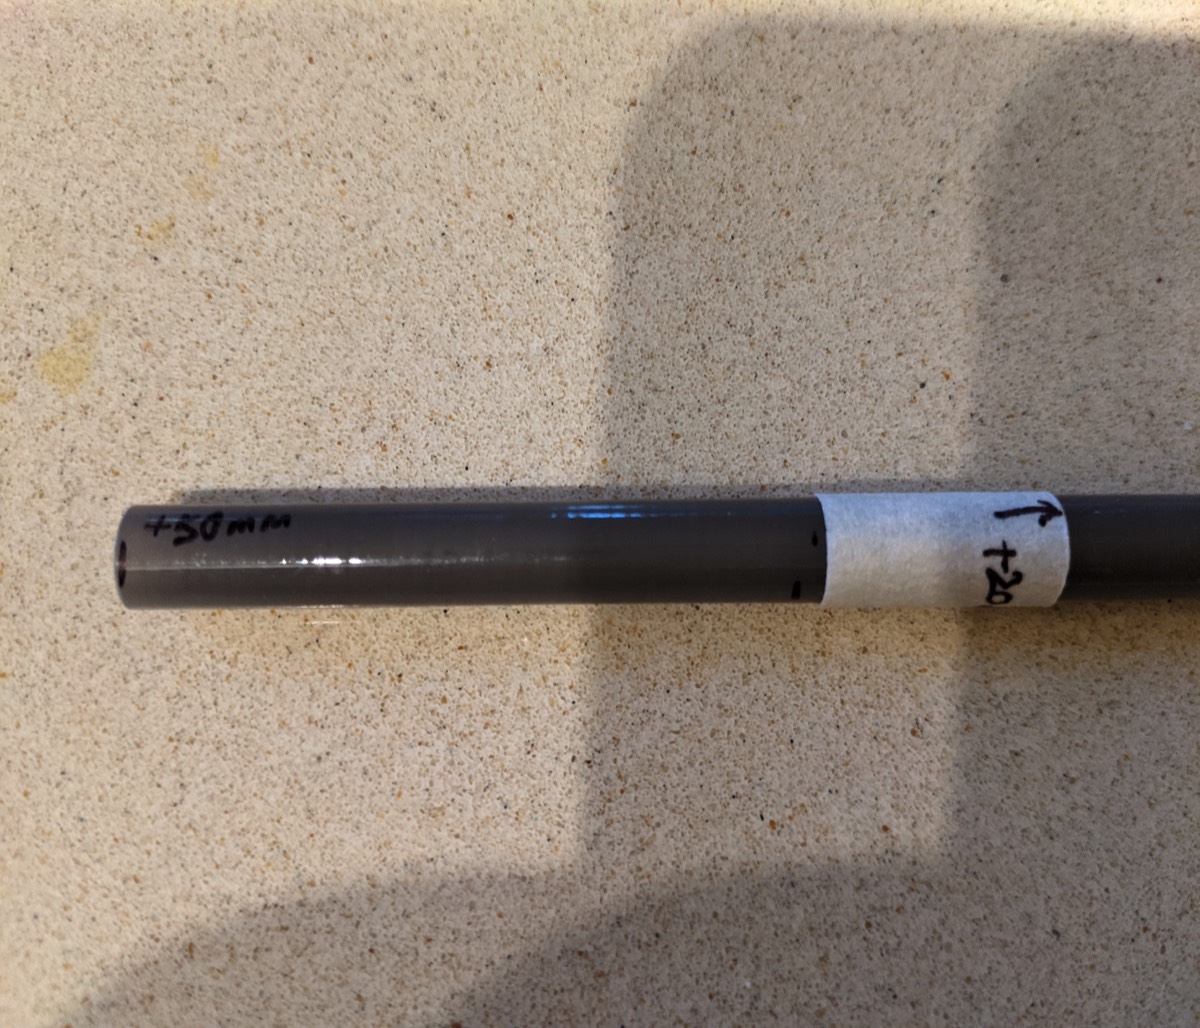
Another darker spigot facing the other way. This time it is longer at 50mm, plus 20mm to be glued inside the male shoulder. I’ve cut off the thin end beyond the spigot and the tape on the thick end is a reminder of where to finally cut it to length. The ‘flat to flat’ measurement/mark is the bottom one to the left of the tape (ignore the top mark which makes sense in the next pic).
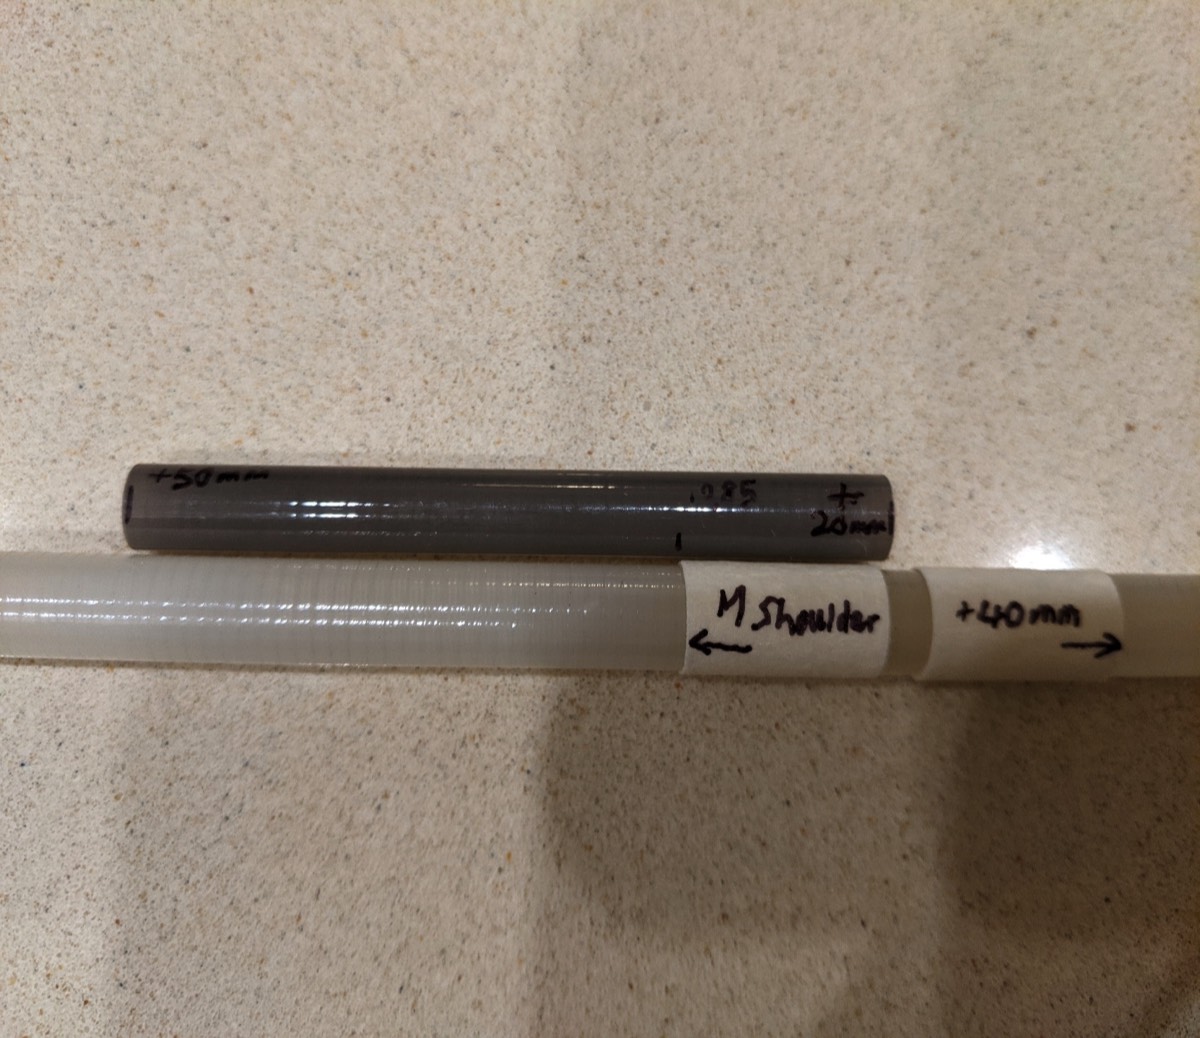
Same spigot cut to its final length. I retained the big end of the spigot tube to first push it into the clear outer tube and mark where the flat to flat measurement came to inside the clear outer tube. That mark is just under the edge of the tape beneath the tip of the arrow. (The M shoulder arrow shows where to cut, as does the 40mm arrow). Male shoulder will be 40mm in total and the shoulder overlaps the thick end of the spigot 20mm. The other 20mm will cover the bamboo which buts up to the thick end of the spigot under the ‘shoulder’.Note that the tape isn’t 20mm wide. They are measured exactly!
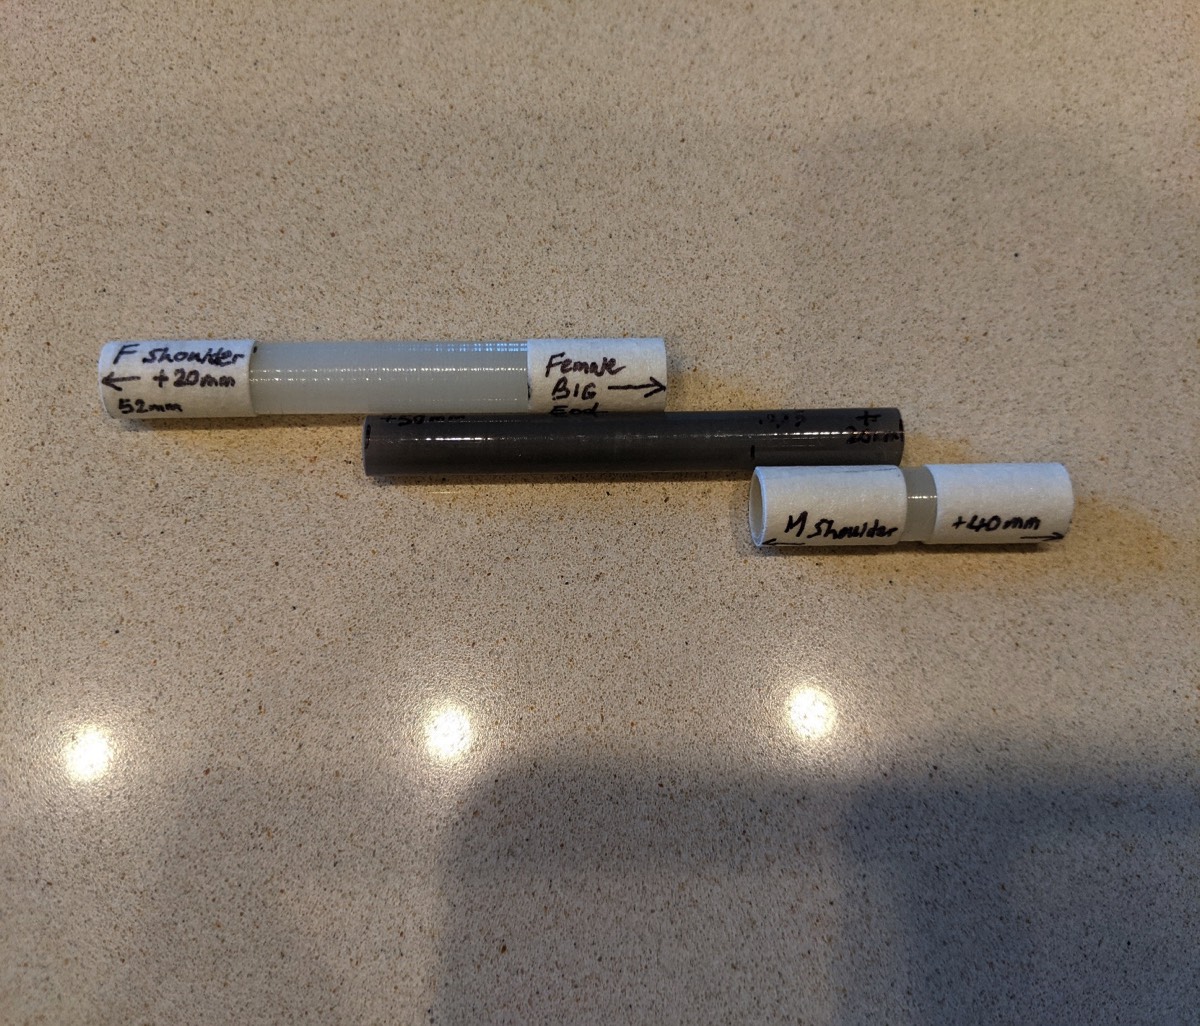
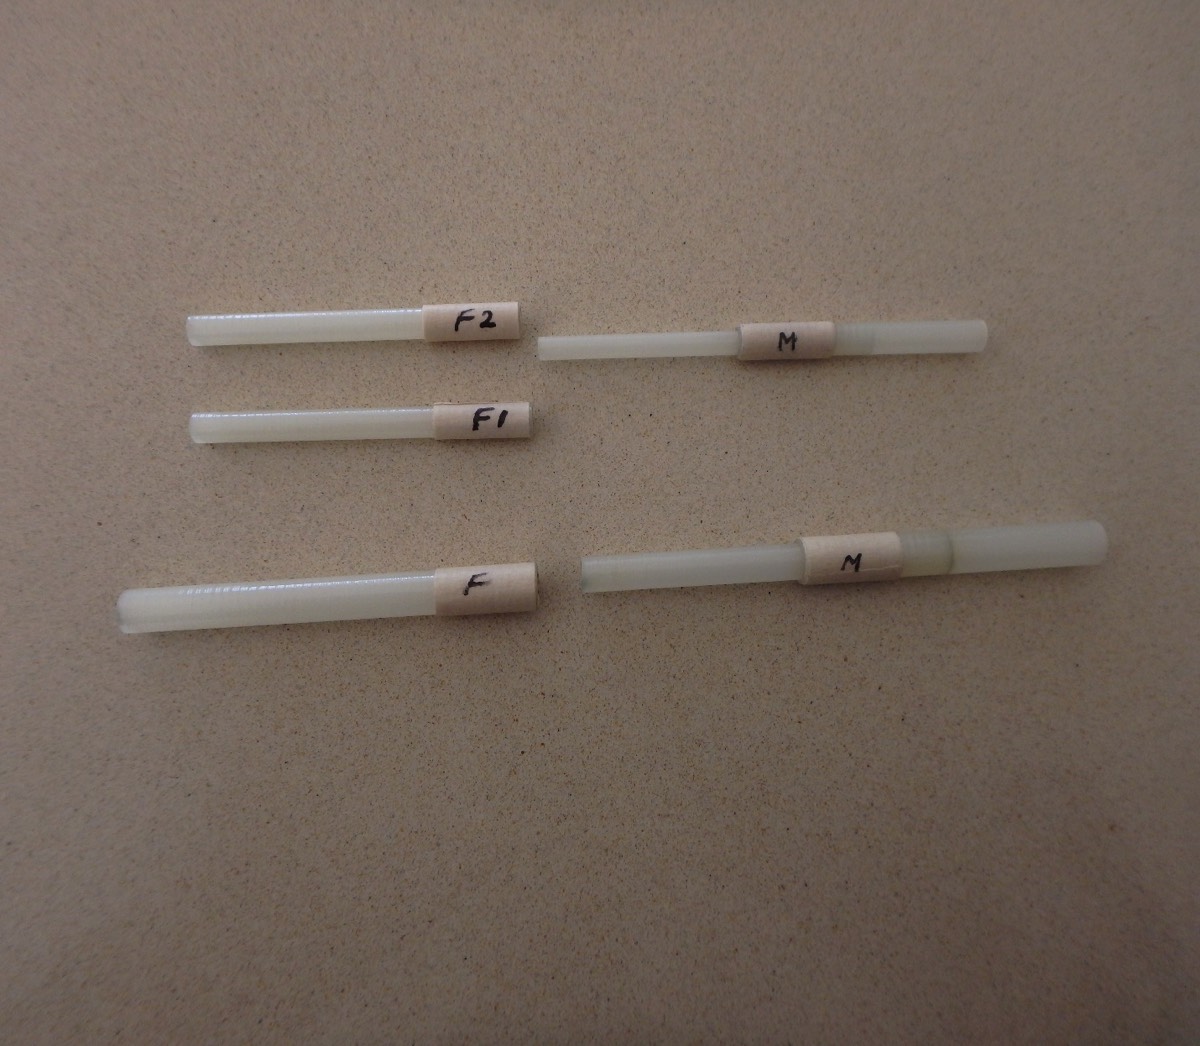
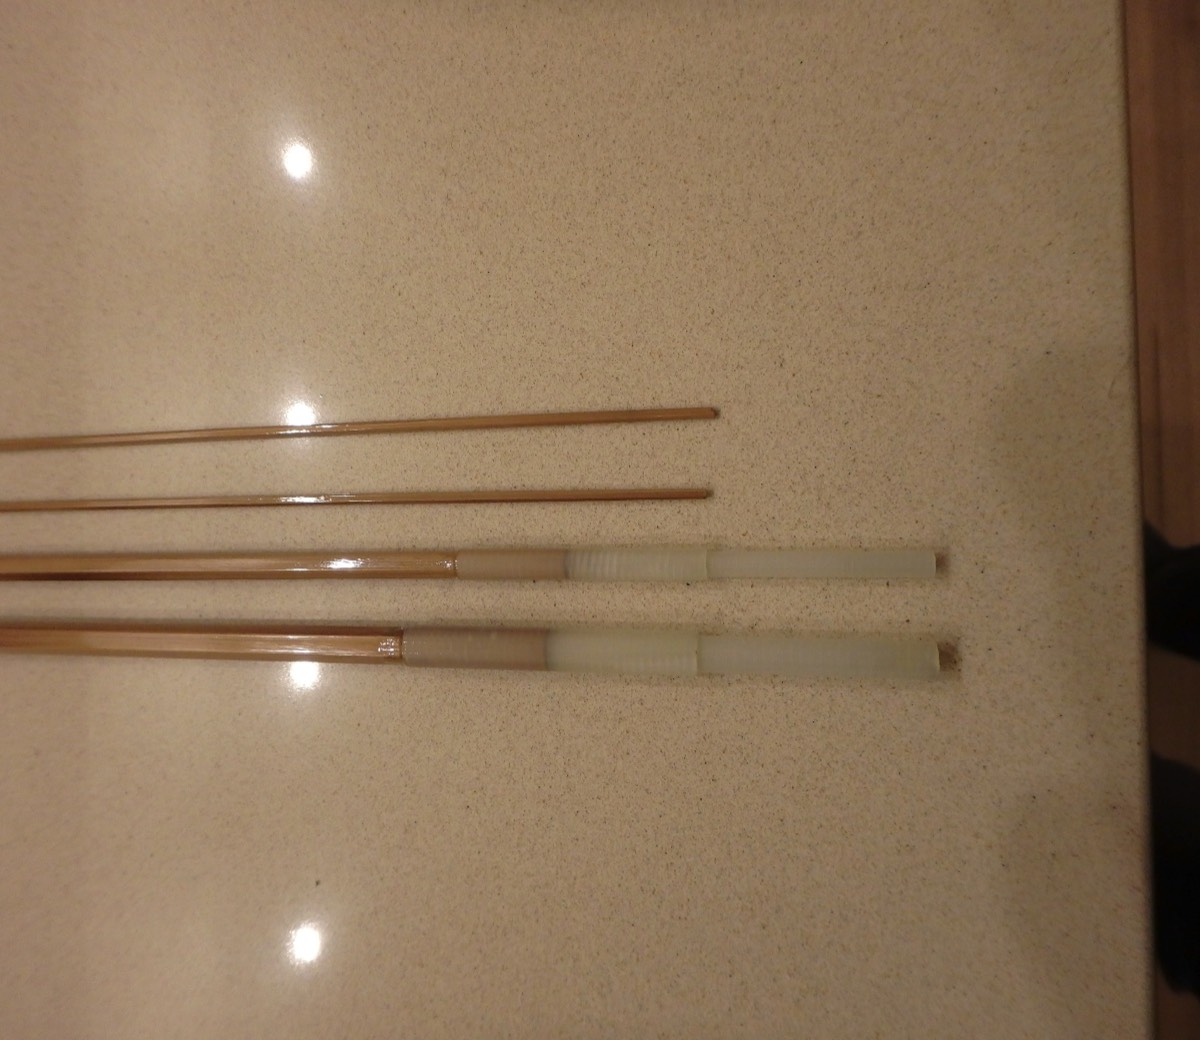
The components of the above ferrule once cut to final lengths.
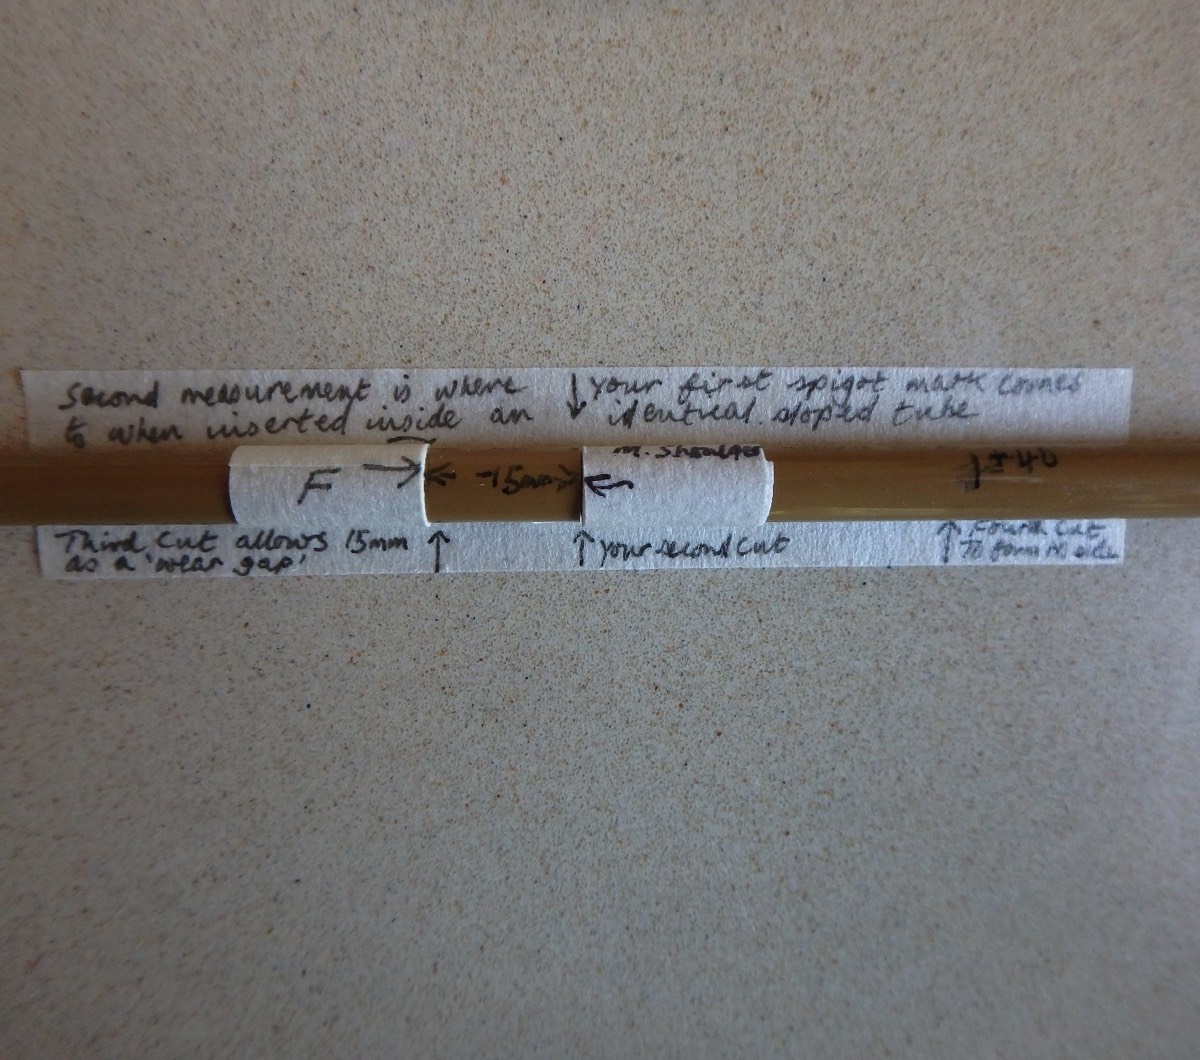
Ok let’s go back a step. This is another tube I used to make both sides of an outer ferrule. The previous picture showed all the pieces of a completed ferrule, but didn’t show how to make the female. Creating a tight fit between your spigot and the female is critical (as well as leaving a wear gap). To the right of where is says “your second cut” creates the male shoulder and the spigot will emerge at this point. I always remove 15mm from the remaining outer to tighten up the fit of the spigot into the female and to leave a good ‘wear gap’ (see “Third cut” above). The Female is to the left of that 15mm mark. Don’t be tempted to immediately cut the female (plus shoulder) to its final length after removing that 15mm, because you may need to remove more to get a decent wear gap! (See main text for more on this point).
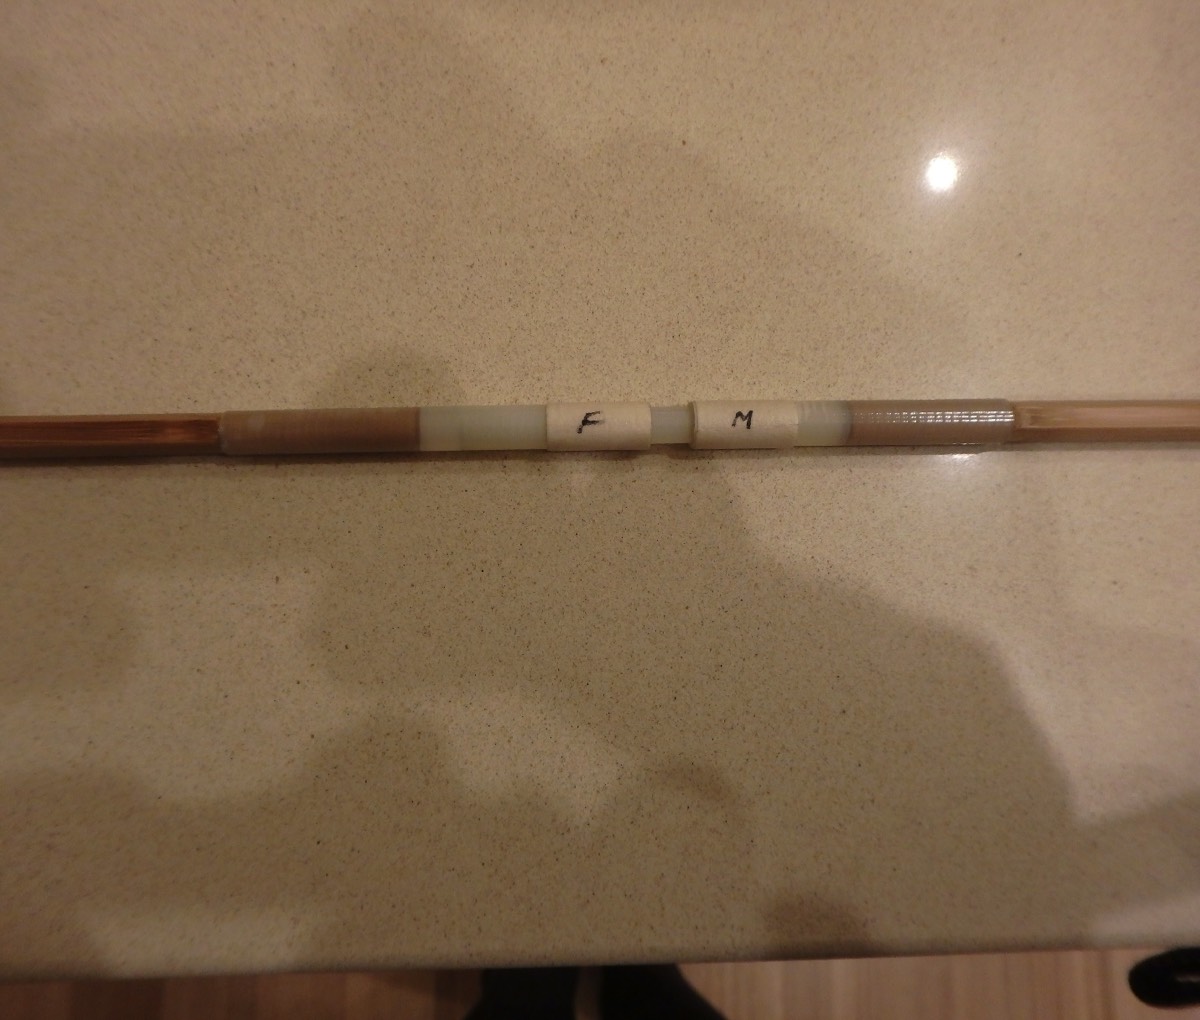
Another completed ferrule ready for gluing. The line on the spigot is the ‘Flat to flat’ measurement; male shoulder to the right; female shoulder/female to the left.
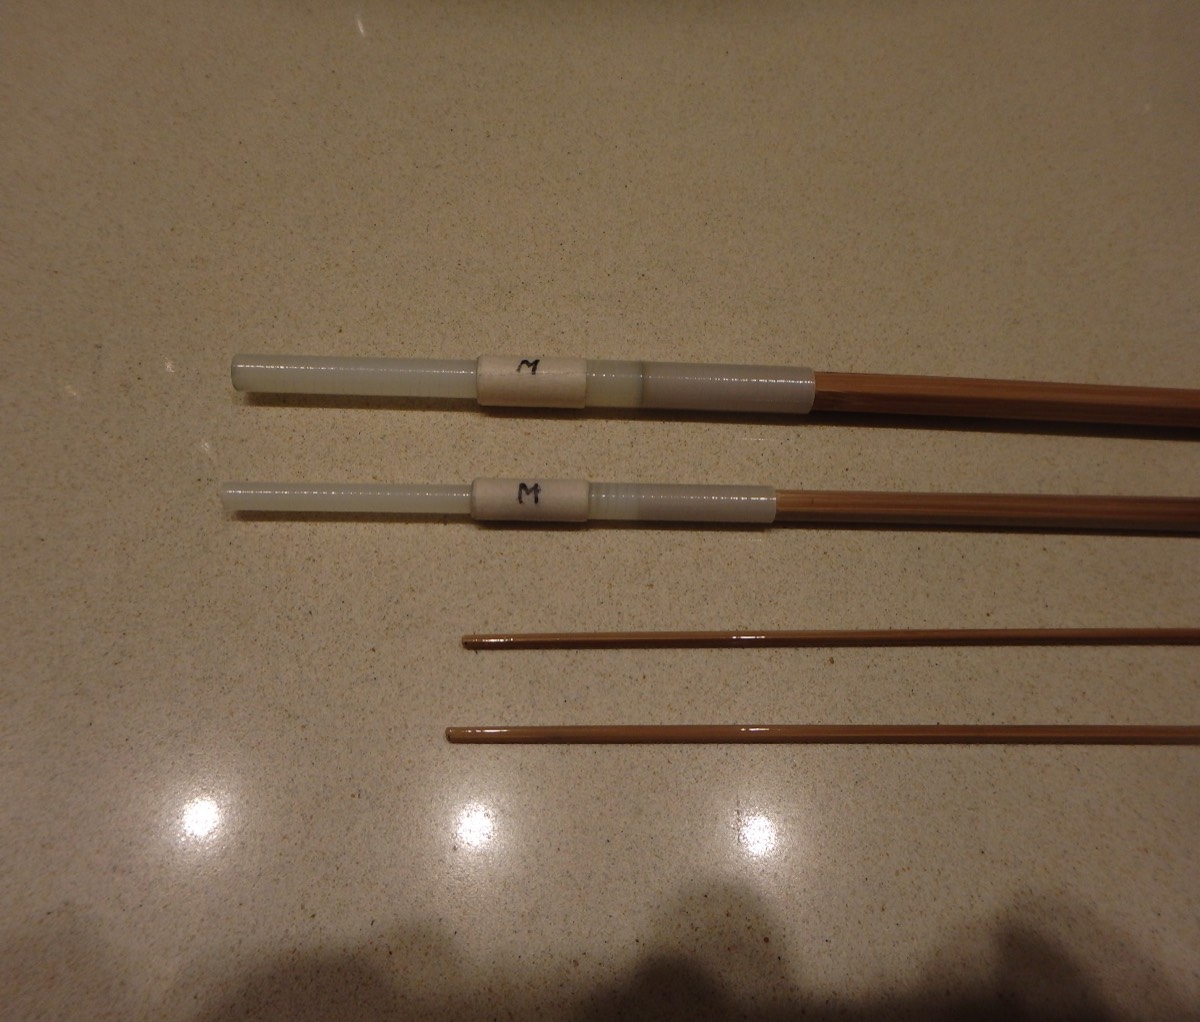
Spigots glued into male shoulders. Males and females ready to fit to a 3-pce blank. I will put reinforcement on the big ends of the males and small ends of the females when prepping the blank ends to fit. Both are vulnerable to splitting until glued onto the blank (and bound).
Working out where to do final trimming of a 3-pce blank by lining up all the ‘bits’ of female ferrules via the ‘table top’ method. Arrows on RHS of the outside tape indicate final cuts, while tape to the left will remain for prepping the blanks up to the edge of the tape.
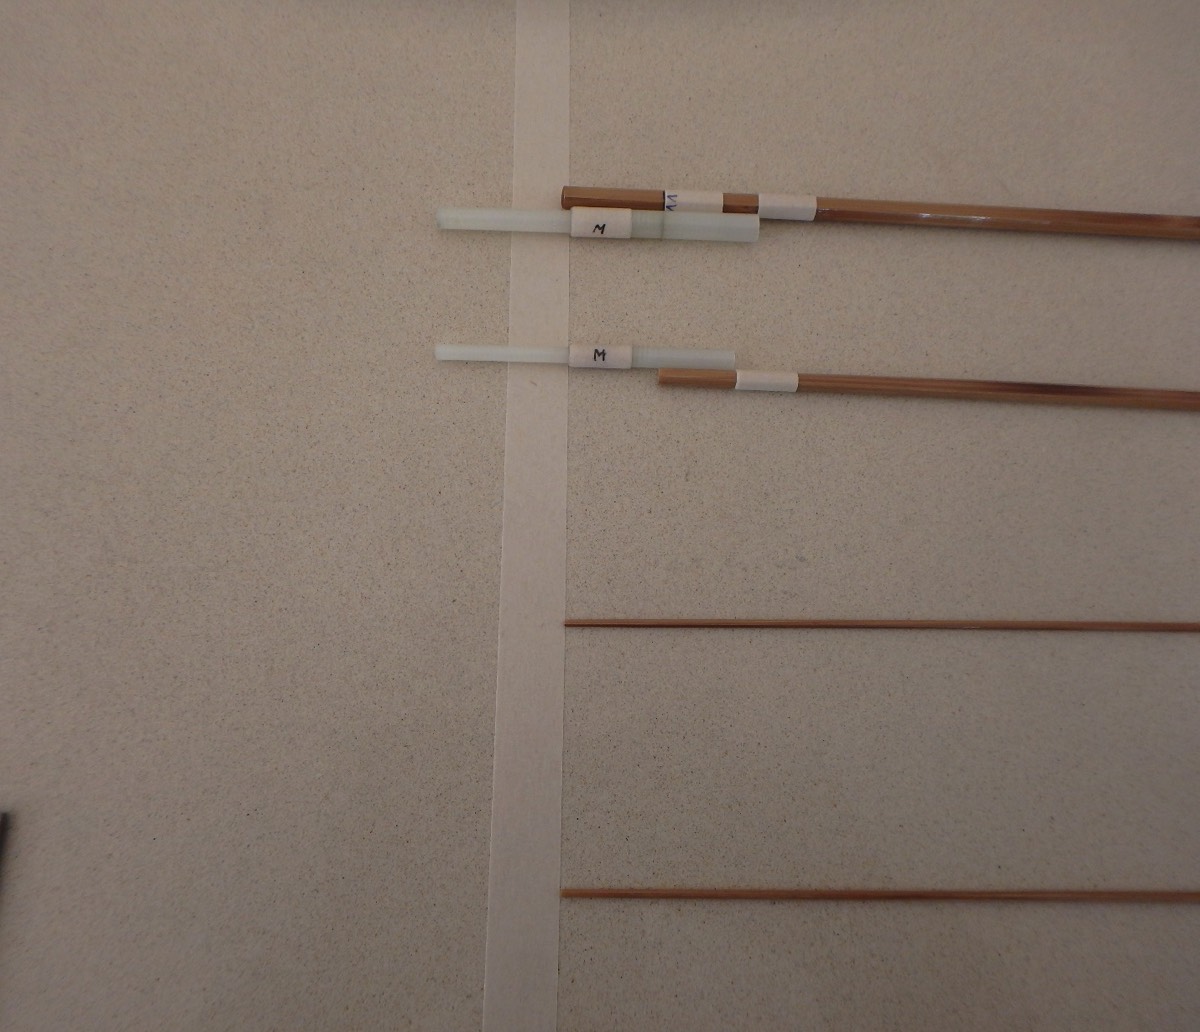
Same deal at the other end for the male ferrules. Note that I don’t count the spigots in calculating the final length of each section, but be free to do otherwise. Those tips will need to be trimmed once I’ve chosen suitable tip tops!
Blank prepped for the males much like NS ferrules. Aim for a smooth slip fit. Once fitted, I remove the reinforcement tape before gluing.
Ditto for the females. Read my warnings in the main text about not aiming for too tight a fit and about the two times reverse taper problem when prepping the females.
Males glued and ready to wrap!
A decent wear gap, but if anything I go for a little wider these days. Also, beware blanks with narrow prominent ridges on raw, uncoated glass for your spigots, because those ridges will wear quickly. I got caught out on my first prototype I brought to Cressy Cane – the wear gaps on my 3-pce perfectionist were gone by day 3 and the spigots needed recoating with thin epoxy when I got home! I now always go for blanks that are pretty smooth with a hard finish coat, especially for spigots.
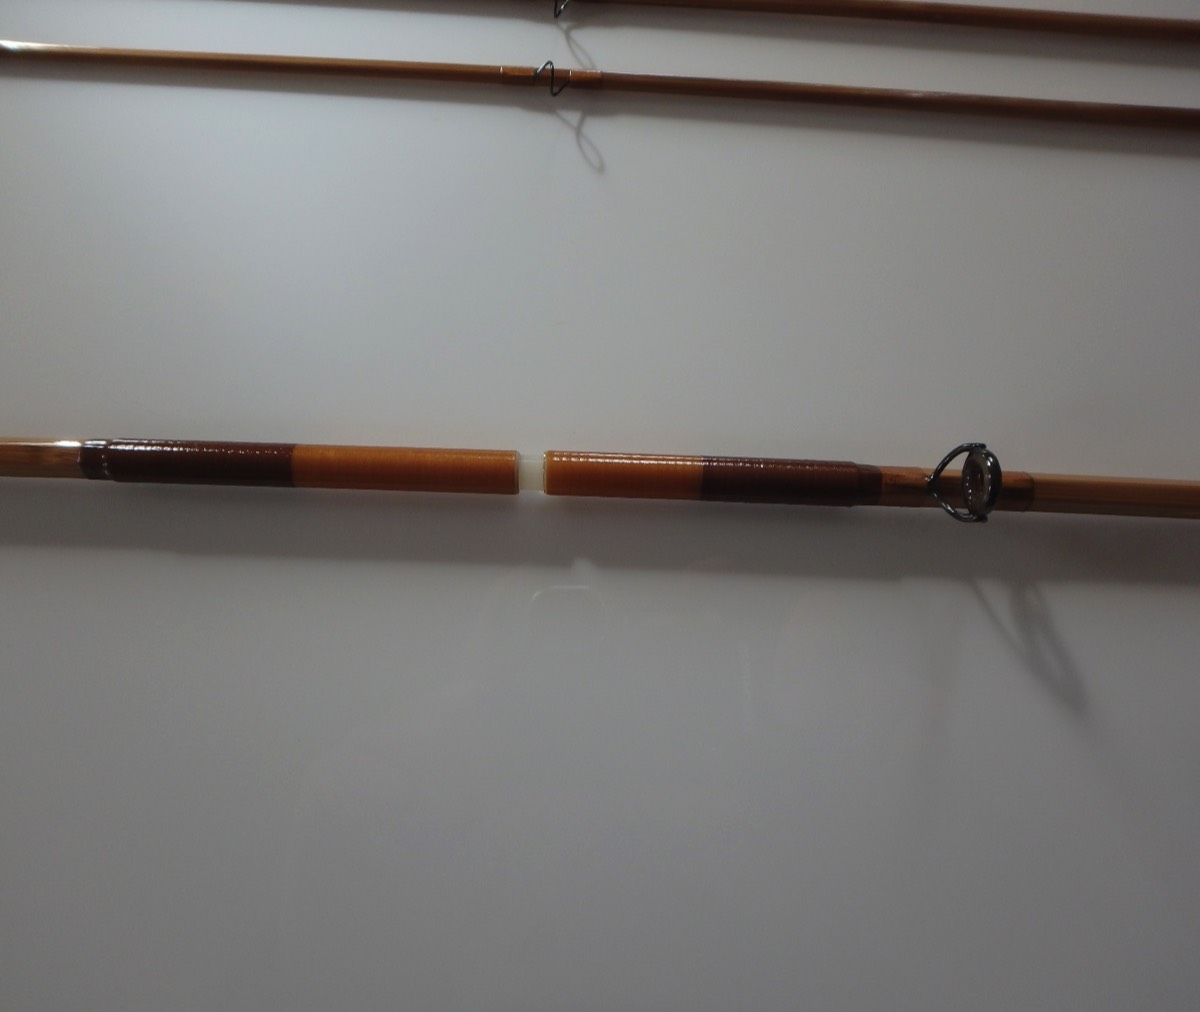
Same blank with the ferrules wrapped, varnished and ready to go fishing!